> ## Documentation Index
> Fetch the complete documentation index at: https://docs.blitzy.com/llms.txt
> Use this file to discover all available pages before exploring further.
# Environment Configuration
> Configure build instructions, secrets, and private registries so Blitzy can build and run your application
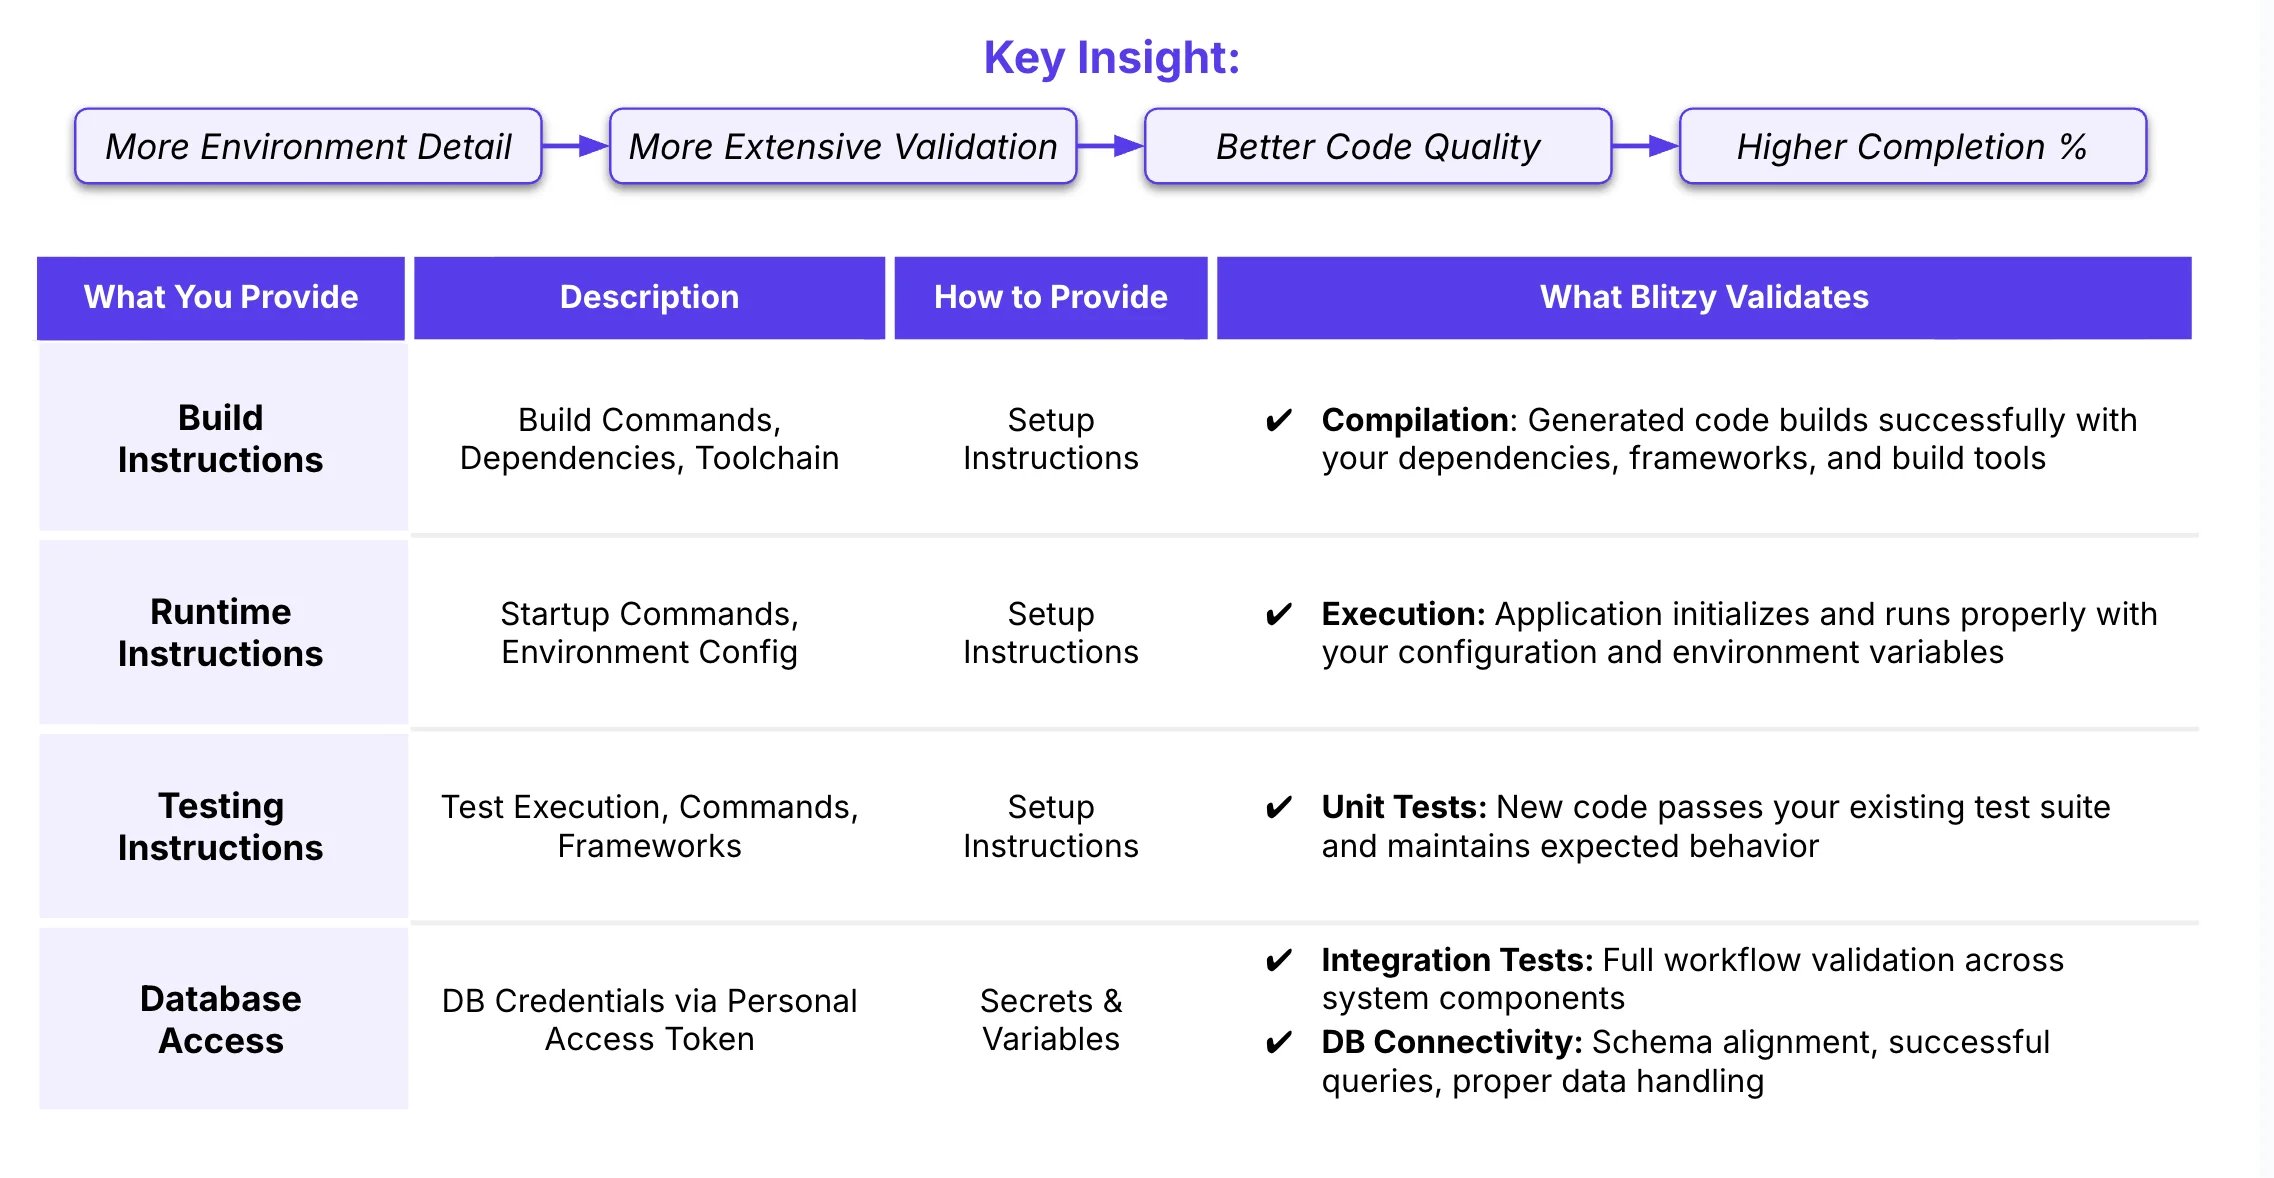
Environment configuration tells Blitzy how to build and run your application. Provide the same level of detail you would give a new developer on their first day - toolchain versions, dependency installation commands, environment variable definitions, and startup procedures.
**Jump to:** [Setup Instructions](#setup-instructions) • [Example](#example-setup-instructions) • [Variables & Secrets](#variables--secrets) • [Best Practices](#best-practices) • [Getting Started](#getting-started) • [Multiple Environments](#multiple-environments) • [Troubleshooting](#troubleshooting)
 ## Setup Instructions
Your setup instructions should provide a complete, unambiguous path from a fresh environment to a running application. Write them in **natural language**. Blitzy's agents interpret plain-English instructions, not just shell scripts.
### What to Include
* Runtime and language version (e.g., Node.js 20, Java 21, Python 3.12)
* Build tools and package managers (e.g., Maven 3.9, npm, Make)
* Database systems needed for testing (e.g., PostgreSQL 15, MongoDB 7.0)
* Container runtime if applicable (e.g., Docker Desktop)
* Cloud credential setup (service account keys, credential files)
* Internal package registries or artifact repositories
* How to authenticate (PAT, service accounts, credential files)
* Where credential files should be placed (e.g., `~/.m2/settings.xml`, `.npmrc`)
* **UI login credentials** for applications gated by a login screen (see warning below)
* Exact commands to install dependencies
* Build commands with any required flags
* Database migration or initialization steps
* Commands to start the application
* How to run tests (if applicable)
* Configuration files required (e.g., `.env.local`, `application.yml`)
* Where these files must be located
* Which secrets or variables they reference
* Variables that need aliasing or renaming at runtime
* Variables that should NOT be set globally (only per-command)
* Service URL overrides or internal routing rules
## Example Setup Instructions
The example below demonstrates a multi-service project with natural-language setup instructions, the format Blitzy works best with.
```text theme={null}
Acme Platform — Setup Instructions
Requirements: Python 3.11, Node.js 20
--- API Server ---
To install and build:
make setup
make install
--- Variable Aliasing ---
These variables have platform-suffixed names that differ from what the code expects:
API_GATEWAY_URL_PLATFORM → used internally as API_GATEWAY_URL
WORKER_URL_PLATFORM → used internally as WORKER_URL
VAULT_URL_PLATFORM → used internally as VAULT_URL
Use the _PLATFORM variants when configuring your environment. Do not create
the short-name versions — the build handles the mapping.
--- Web Client ---
Start the development server:
npm run dev
--- Docs Site ---
Create a `.env.local` file in the `docs-site/` directory with these values:
HEADLESS_CMS_ORG_ID=${HEADLESS_CMS_ORG_ID}
HEADLESS_CMS_API_KEY=${HEADLESS_CMS_API_KEY}
HEADLESS_CMS_PREVIEW_KEY=${HEADLESS_CMS_PREVIEW_KEY}
HEADLESS_CMS_WEBHOOK_SECRET=${HEADLESS_CMS_WEBHOOK_SECRET}
--- Testing ---
Where available, run `make test` and confirm all tests pass before
considering setup complete.
```
These instructions are written in plain English with clear section headings, not as a shell script. Tell Blitzy's agents *what to do* and *what to watch out for*; they will figure out the right commands.
## Variables & Secrets
### What's the Difference?
* **Variables** - Non-sensitive configuration (e.g., `NODE_ENV=production`, feature flags, public endpoints). Stored as plaintext.
* **Secrets** - Sensitive credentials (e.g., database passwords, API keys, service account keys). Encrypted at rest, masked in all logs, and never sent to AI agents.
### Configuration Examples
| Configuration | Type | Example | Use Case |
| :------------------------- | :------- | :------------------------------------- | :------------------------------- |
| `DB_CONNECTION_STRING` | Secret | `postgresql://user:pass@host:5432/db` | Application connects to database |
| `HEADLESS_CMS_API_KEY` | Secret | `sk_abc123...` | Headless CMS access |
| `API_GATEWAY_URL_PLATFORM` | Variable | `https://gateway.internal.example.com` | Internal service routing |
| `NODE_ENV` | Variable | `production`, `development` | Framework behavior |
| `LOG_LEVEL` | Variable | `info`, `debug`, `error` | Logging verbosity |
| `FEATURE_FLAG_XYZ` | Variable | `true`, `false` | Feature toggles |
### How Secrets Work
1. **Canonical Secret Names** - Define secret references (e.g., `${DB_PASSWORD}`) in your setup instructions or configuration files.
2. **Encrypted Storage** - Actual secret values are stored encrypted and only accessible to authorized users.
3. **Masked Logs** - Any secret value that appears in logs is automatically replaced with `***REDACTED***`.
4. **Not Sent to AI** - Secrets are never included in prompts or sent to AI models. The AI only sees the reference names (e.g., `${DB_PASSWORD}`).
## UI Login Credentials for Auth-Gated Applications
**If your application has a login screen, you must provide Blitzy with valid credentials.** Blitzy validates UI by actively testing the running application. Without login credentials, the platform cannot access screens beyond the login page, resulting in UI that may not match your designs.
Include test credentials as **secrets** in your environment configuration. At minimum, provide:
* **Username / email** and **password** for a test account with access to all relevant screens
* **MFA workarounds** if applicable (e.g., a test account with MFA disabled)
* **Role-specific credentials** if different roles have different UI views that need testing
## Best Practices
1. **Be Explicit** - Assume the reader has never seen your codebase. Specify versions, paths, and commands precisely.
2. **Use Natural Language** - Write instructions the way you would explain them to a new teammate. Blitzy interprets plain English, not just shell commands.
3. **Call Out Gotchas** - If a variable must not be exported globally, or a command needs a specific env var set inline, say so explicitly.
4. **Reference Variables and Secrets Correctly** - Use `${VARIABLE_NAME}` syntax for both variables and secrets so Blitzy can substitute values at runtime.
5. **Test Your Instructions** - The best way to validate setup instructions is to follow them yourself on a clean machine or container.
6. **Document Assumptions** - If your build assumes certain tools are installed or services are running, state that clearly.
## Getting Started
Open your Blitzy dashboard and go to the Environments section.
Create an environment for your target (Development, Staging, Production).
Write natural-language build and run instructions following the patterns above.
Add non-sensitive variables as plaintext and sensitive credentials as encrypted secrets.
Save the configuration and click **Test Setup** to validate it. See the [Environment Testing](/project-lifecycle/environment-testing) guide for details on what the test checks and how to interpret the results.
When beginning Blitzy Projects, you will be prompted to attach the appropriate environment(s) during project setup.
**Windows desktop validation:** If your project uses [Computer Use on Windows](/project-lifecycle/code-review#validation-signals) to visually validate a desktop application, you need a Windows environment with UI login credentials and desktop-specific setup instructions. See [Computer Use on Windows](/project-lifecycle/code-review#validation-signals) for details.
## Multiple Environments
A project can use more than one environment. Each environment is assigned a **position**, where position 1 is the highest priority.
When a build runs, environments are merged using these rules:
| Field | Merge Rule |
| :------------- | :---------------------------------------------------------------------- |
| `instructions` | Taken from the highest-priority environment with non-empty instructions |
| `target_os` | Taken from position 1 |
| `variables` | First-writer wins: position 1 sets a key, later positions skip it |
| `secrets` | Same first-writer wins rule |
| `files` | Merged by filename; higher-priority environment wins on conflict |
### Recommended Pattern
* **Position 2** - A shared "company base" environment with common build instructions, registry URLs, and shared credentials
* **Position 1** - A project-specific "override" environment for anything that differs from the base
This lets you update shared configuration in one place without editing every project.
If all configuration is project-specific, a single environment at position 1 is fine. No layering needed.
### Do You Need a New Environment?
| Question | Recommendation |
| :--------------------------------------------------------------------------------------- | :----------------------------------------------------------------------------------------------------------------------------------------- |
| Does an existing environment match your OS and tech stack? | Reuse it. Attach it to your project. |
| Does your project need project-specific secrets? | Create a thin override at position 1; attach the shared base at position 2 |
| Is the tech stack or OS different from all existing environments? | Create a new environment |
| Does the build require different instructions (different runtime, toolchain, framework)? | Create a new environment |
| Does your project use Computer Use for Windows desktop validation? | Create a Windows environment with desktop setup instructions and [UI login credentials](#ui-login-credentials-for-auth-gated-applications) |
Create a new environment only when no existing environment's `instructions` and `target_os` match your project's build requirements.
## Troubleshooting
**Cause:** Environment not attached to the project, or sync has not completed.
**Fix:** Check **Project Settings** to verify the environment is attached. Wait 60 seconds and retry - the sync may still be in progress.
**Cause:** A higher-priority environment already defines the same key (first-writer wins).
**Fix:** Check the variable names across all attached environments. Rename or remove the duplicate in the higher-priority environment.
**Cause:** `target_os` is always taken from the position-1 environment.
**Fix:** Move the environment with the correct OS to position 1.
**Cause:** Environments require explicit or team-based sharing.
**Fix:** Ask the environment owner to share it with you or your team via **Settings > Environments**.
## Related Guides
Validate your environment before starting code generation
Role-based access control for environments
Connect environments to projects
Visual validation using Windows desktop interaction
## Setup Instructions
Your setup instructions should provide a complete, unambiguous path from a fresh environment to a running application. Write them in **natural language**. Blitzy's agents interpret plain-English instructions, not just shell scripts.
### What to Include
* Runtime and language version (e.g., Node.js 20, Java 21, Python 3.12)
* Build tools and package managers (e.g., Maven 3.9, npm, Make)
* Database systems needed for testing (e.g., PostgreSQL 15, MongoDB 7.0)
* Container runtime if applicable (e.g., Docker Desktop)
* Cloud credential setup (service account keys, credential files)
* Internal package registries or artifact repositories
* How to authenticate (PAT, service accounts, credential files)
* Where credential files should be placed (e.g., `~/.m2/settings.xml`, `.npmrc`)
* **UI login credentials** for applications gated by a login screen (see warning below)
* Exact commands to install dependencies
* Build commands with any required flags
* Database migration or initialization steps
* Commands to start the application
* How to run tests (if applicable)
* Configuration files required (e.g., `.env.local`, `application.yml`)
* Where these files must be located
* Which secrets or variables they reference
* Variables that need aliasing or renaming at runtime
* Variables that should NOT be set globally (only per-command)
* Service URL overrides or internal routing rules
## Example Setup Instructions
The example below demonstrates a multi-service project with natural-language setup instructions, the format Blitzy works best with.
```text theme={null}
Acme Platform — Setup Instructions
Requirements: Python 3.11, Node.js 20
--- API Server ---
To install and build:
make setup
make install
--- Variable Aliasing ---
These variables have platform-suffixed names that differ from what the code expects:
API_GATEWAY_URL_PLATFORM → used internally as API_GATEWAY_URL
WORKER_URL_PLATFORM → used internally as WORKER_URL
VAULT_URL_PLATFORM → used internally as VAULT_URL
Use the _PLATFORM variants when configuring your environment. Do not create
the short-name versions — the build handles the mapping.
--- Web Client ---
Start the development server:
npm run dev
--- Docs Site ---
Create a `.env.local` file in the `docs-site/` directory with these values:
HEADLESS_CMS_ORG_ID=${HEADLESS_CMS_ORG_ID}
HEADLESS_CMS_API_KEY=${HEADLESS_CMS_API_KEY}
HEADLESS_CMS_PREVIEW_KEY=${HEADLESS_CMS_PREVIEW_KEY}
HEADLESS_CMS_WEBHOOK_SECRET=${HEADLESS_CMS_WEBHOOK_SECRET}
--- Testing ---
Where available, run `make test` and confirm all tests pass before
considering setup complete.
```
These instructions are written in plain English with clear section headings, not as a shell script. Tell Blitzy's agents *what to do* and *what to watch out for*; they will figure out the right commands.
## Variables & Secrets
### What's the Difference?
* **Variables** - Non-sensitive configuration (e.g., `NODE_ENV=production`, feature flags, public endpoints). Stored as plaintext.
* **Secrets** - Sensitive credentials (e.g., database passwords, API keys, service account keys). Encrypted at rest, masked in all logs, and never sent to AI agents.
### Configuration Examples
| Configuration | Type | Example | Use Case |
| :------------------------- | :------- | :------------------------------------- | :------------------------------- |
| `DB_CONNECTION_STRING` | Secret | `postgresql://user:pass@host:5432/db` | Application connects to database |
| `HEADLESS_CMS_API_KEY` | Secret | `sk_abc123...` | Headless CMS access |
| `API_GATEWAY_URL_PLATFORM` | Variable | `https://gateway.internal.example.com` | Internal service routing |
| `NODE_ENV` | Variable | `production`, `development` | Framework behavior |
| `LOG_LEVEL` | Variable | `info`, `debug`, `error` | Logging verbosity |
| `FEATURE_FLAG_XYZ` | Variable | `true`, `false` | Feature toggles |
### How Secrets Work
1. **Canonical Secret Names** - Define secret references (e.g., `${DB_PASSWORD}`) in your setup instructions or configuration files.
2. **Encrypted Storage** - Actual secret values are stored encrypted and only accessible to authorized users.
3. **Masked Logs** - Any secret value that appears in logs is automatically replaced with `***REDACTED***`.
4. **Not Sent to AI** - Secrets are never included in prompts or sent to AI models. The AI only sees the reference names (e.g., `${DB_PASSWORD}`).
## UI Login Credentials for Auth-Gated Applications
**If your application has a login screen, you must provide Blitzy with valid credentials.** Blitzy validates UI by actively testing the running application. Without login credentials, the platform cannot access screens beyond the login page, resulting in UI that may not match your designs.
Include test credentials as **secrets** in your environment configuration. At minimum, provide:
* **Username / email** and **password** for a test account with access to all relevant screens
* **MFA workarounds** if applicable (e.g., a test account with MFA disabled)
* **Role-specific credentials** if different roles have different UI views that need testing
## Best Practices
1. **Be Explicit** - Assume the reader has never seen your codebase. Specify versions, paths, and commands precisely.
2. **Use Natural Language** - Write instructions the way you would explain them to a new teammate. Blitzy interprets plain English, not just shell commands.
3. **Call Out Gotchas** - If a variable must not be exported globally, or a command needs a specific env var set inline, say so explicitly.
4. **Reference Variables and Secrets Correctly** - Use `${VARIABLE_NAME}` syntax for both variables and secrets so Blitzy can substitute values at runtime.
5. **Test Your Instructions** - The best way to validate setup instructions is to follow them yourself on a clean machine or container.
6. **Document Assumptions** - If your build assumes certain tools are installed or services are running, state that clearly.
## Getting Started
Open your Blitzy dashboard and go to the Environments section.
Create an environment for your target (Development, Staging, Production).
Write natural-language build and run instructions following the patterns above.
Add non-sensitive variables as plaintext and sensitive credentials as encrypted secrets.
Save the configuration and click **Test Setup** to validate it. See the [Environment Testing](/project-lifecycle/environment-testing) guide for details on what the test checks and how to interpret the results.
When beginning Blitzy Projects, you will be prompted to attach the appropriate environment(s) during project setup.
**Windows desktop validation:** If your project uses [Computer Use on Windows](/project-lifecycle/code-review#validation-signals) to visually validate a desktop application, you need a Windows environment with UI login credentials and desktop-specific setup instructions. See [Computer Use on Windows](/project-lifecycle/code-review#validation-signals) for details.
## Multiple Environments
A project can use more than one environment. Each environment is assigned a **position**, where position 1 is the highest priority.
When a build runs, environments are merged using these rules:
| Field | Merge Rule |
| :------------- | :---------------------------------------------------------------------- |
| `instructions` | Taken from the highest-priority environment with non-empty instructions |
| `target_os` | Taken from position 1 |
| `variables` | First-writer wins: position 1 sets a key, later positions skip it |
| `secrets` | Same first-writer wins rule |
| `files` | Merged by filename; higher-priority environment wins on conflict |
### Recommended Pattern
* **Position 2** - A shared "company base" environment with common build instructions, registry URLs, and shared credentials
* **Position 1** - A project-specific "override" environment for anything that differs from the base
This lets you update shared configuration in one place without editing every project.
If all configuration is project-specific, a single environment at position 1 is fine. No layering needed.
### Do You Need a New Environment?
| Question | Recommendation |
| :--------------------------------------------------------------------------------------- | :----------------------------------------------------------------------------------------------------------------------------------------- |
| Does an existing environment match your OS and tech stack? | Reuse it. Attach it to your project. |
| Does your project need project-specific secrets? | Create a thin override at position 1; attach the shared base at position 2 |
| Is the tech stack or OS different from all existing environments? | Create a new environment |
| Does the build require different instructions (different runtime, toolchain, framework)? | Create a new environment |
| Does your project use Computer Use for Windows desktop validation? | Create a Windows environment with desktop setup instructions and [UI login credentials](#ui-login-credentials-for-auth-gated-applications) |
Create a new environment only when no existing environment's `instructions` and `target_os` match your project's build requirements.
## Troubleshooting
**Cause:** Environment not attached to the project, or sync has not completed.
**Fix:** Check **Project Settings** to verify the environment is attached. Wait 60 seconds and retry - the sync may still be in progress.
**Cause:** A higher-priority environment already defines the same key (first-writer wins).
**Fix:** Check the variable names across all attached environments. Rename or remove the duplicate in the higher-priority environment.
**Cause:** `target_os` is always taken from the position-1 environment.
**Fix:** Move the environment with the correct OS to position 1.
**Cause:** Environments require explicit or team-based sharing.
**Fix:** Ask the environment owner to share it with you or your team via **Settings > Environments**.
## Related Guides
Validate your environment before starting code generation
Role-based access control for environments
Connect environments to projects
Visual validation using Windows desktop interaction